Установать таймер и sqlQuery | set a timer and sqlQuery

Я делал пример для пользователя @yasser163

в котором я хотел реализовать с помощью кода проверку полей и запись значений в БД, но у меня возникли проблемы:
I made an example for user yasser163
in which I wanted to implement using code to check fields and write values ​​to the database, but I had problems:

В этом листинге я хотел создать запись в БД с помощью sqlQuery, но ничего не вышло.
Пожалуйста, исправьте этот пример, что бы я мог увидеть свои ошибки.
In this listing, I wanted to create a database record using sqlQuery, but nothing worked.
Please correct this example so I can see my mistakes.

import QtQuick 2.2

Item {
    id: saveMaterial
    property bool cancel: false
    property string iduser: document.childByName("Text_user_ID").content.text 
    property string idinvoice: document.childByName("CobmboBox_Invoice").content.listValue
    Connections {
    target: document.childByName("Button_Ok").scriptAdaptor
    onEventItemPressed: {
            for ( var i = 0; i <= 9; i++) {
			   if (document.childByName("TextField_Material_"+i).visible) {
			     if (document.childByName("TextField_Material_"+i).content.text == '')  {
			         document.childByName("TextField_Material_"+i).style.controlColor = "colorPink"  
			         cancel = true
			         break
			     }
			       
			  }
		   }
	    if (cancel == false) {
	          for ( var i = 0; i <= 9; i++) {
	             if (document.childByName("TextField_Material_"+i).visible) {
	               document.childByName("Table_Material").sqlQuery = "INSERT INTO data(iduser,idinvoise,material)VALUES("+iduser+","+idinvoice+","+document.childByName("TextField_Material_"+i).content.text+")" 
                 }
	          }
	       }
        }
    }
}

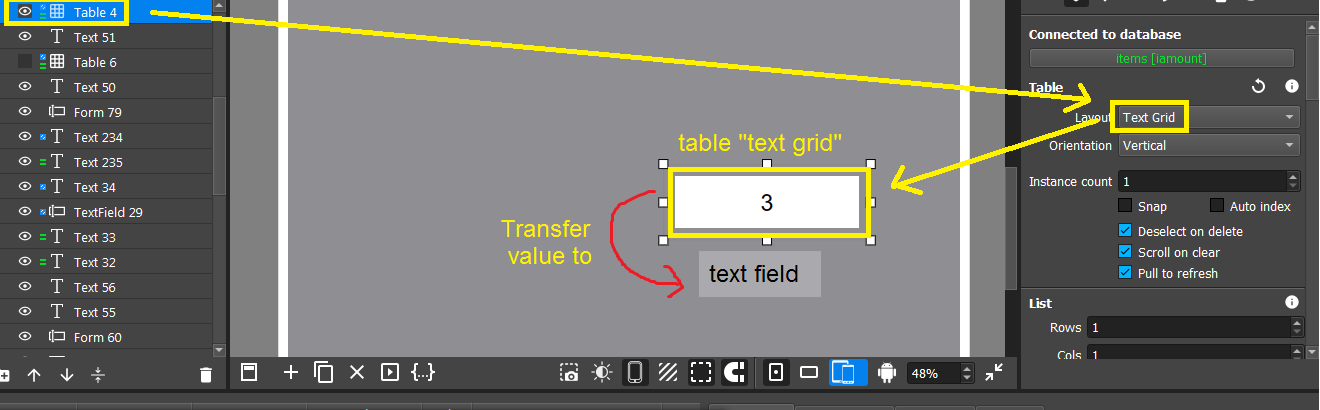
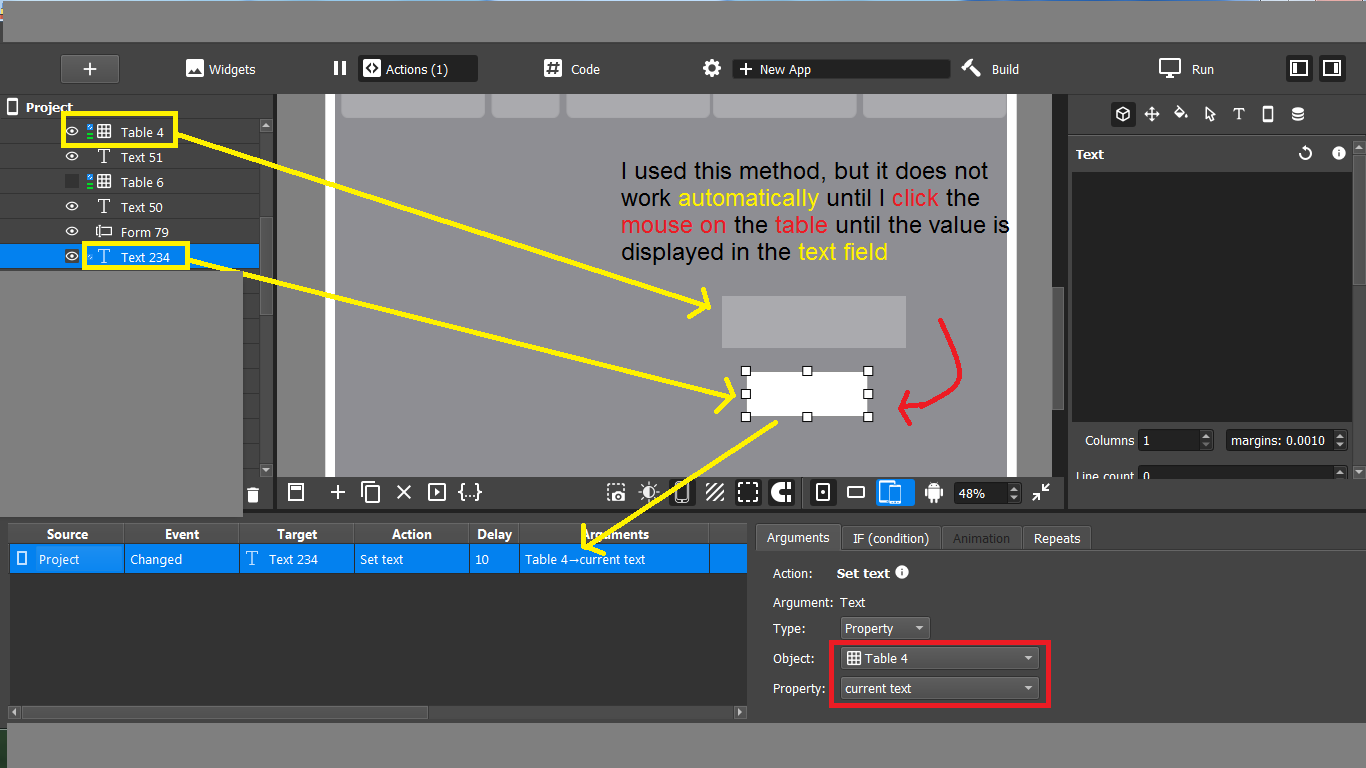
Потом я немного переписал листинг и попытался использовать в нем команды (действия), но тоже потерпел неудачу, все потому, что программе нужно время для создания записи. Установить таймер мне так и не удалось. Пожалуйста, продемонстрируйте на этом примере как можно установить таймер в цикле.
Then I rewrote the listing a little and tried to use commands (actions) in it, but I also failed, all because the program takes time to create the entry. I was never able to set the timer. Please demonstrate with this example how you can set a timer in a loop.

import QtQuick 2.2

Item {
    id: saveMaterial
    property bool cancel: false
    property string iduser: document.childByName("Text_user_ID").content.text 
    property string idinvoice: document.childByName("CobmboBox_Invoice").content.listValue
    Connections {
    target: document.childByName("Button_Ok").scriptAdaptor
    onEventItemPressed: {
            for ( var i = 0; i <= 9; i++) {
			   if (document.childByName("TextField_Material_"+i).visible) {
			     if (document.childByName("TextField_Material_"+i).content.text == '')  {
			         document.childByName("TextField_Material_"+i).style.controlColor = "colorPink"  
			         cancel = true
			         break
			     }
			       
			  }
		   }
	    if (cancel == false) {
	          for ( var i = 0; i <= 9; i++) {
	             if (document.childByName("TextField_Material_"+i).visible) {
	                document.childByName("Table_Material").scriptAdaptor.actionQueryBegin("-1")
                    document.childByName("Table_Material").scriptAdaptor.actionQueryField("iduser",iduser)
                    document.childByName("Table_Material").scriptAdaptor.actionQueryField("idinvoise",idinvoice)
                    document.childByName("Table_Material").scriptAdaptor.actionQueryField("material",document.childByName("TextField_Material_"+i).content.text)
                    document.childByName("Table_Material").scriptAdaptor.actionQueryEnd()
                 }
	          }
	       }
        }
    }
}
2 Likes

Can you send the minimal project file so we can fix this quickly?

1 Like

test_test.flp (56.3 KB)
Код висит на кнопке Button_Ok
The code hangs on the Button_Ok button

1 Like

Could you describe your task? What are you trying to do with the tables?

And this is so:

1- How do we collect the prices of all invoices belonging to each customer, then store them and place them in a field in the customers table

2-And also the possibility of unpaid invoices. How do we store all the remaining payments from customer invoices in the Customers table field and display it?

3- How do we add a button that pays unpaid bills according to each customer, stores that, and reveals his balance and the rest of the amount when selecting the customer

Can you share tables with sample data (Google Sheets or other format)? In the test_test.flp there is no Price or Unpaid field…

1 Like

В таблице Table_User выбираем имя, жмем кнопку Button_Add, в появившейся группе выбираем счет пользователя ( CobmboBox_Invoice ), и теперь добавляем значения TextField_Material_0 … 9, всего можно заполнить 10 полей.
Жмем кнопку Button_Ok
Теперь должен работать скрипт:
Скрипт проверяет поля TextField_Material …, если поле “видимо” - то проверяется его значение, если все видимые поля заполнены скрипт переходит к следующему циклу, в котором создает новые записи в таблице dbMaterial с привязкой к id выбранного пользователя и id его счета.

In the Table_User table, select a name, click the Button_Add button, in the group that appears, select the user account (CobmboBox_Invoice), and now add the values of TextField_Material_0 … 9, in total you can fill in 10 fields.
Click the Button_Ok button
The script should now work:
The script checks the TextField_Material …. fields, if the field is “visible”, then its value is checked, if all visible fields are filled in, the script moves on to the next cycle, in which it creates new records in the dbMaterial table with reference to the id of the selected user and the id of his account.

1 Like

Mr. Vladimir_PV
He provided a comprehensive explanation of the problem because he was the one who built the project in his own way and helped me with it Knowing that the **database ** project we need without the Internet_ offline db_

Here is the fixed version test_test_fixed.flp (57.4 KB)

All actions in Flipabit are asynchronous. Therefore, in this case, after adding a record to the table, we need to wait for the corresponding event (onEventDatabaseRowAdded) and only then add the next record.

The only change in your project is the code for the OK button:

import QtQuick 2.2

Item {
    id: saveMaterial
    property var listArray: []
    property int listIndex: 0
    
    function addRow() {
        console.log("addRow", listArray[listIndex])
        document.childByName("Table_Material").scriptAdaptor.actionQueryBegin("-1")
        document.childByName("Table_Material").scriptAdaptor.actionQueryField("iduser",document.childByName("Text_user_ID").content.text)
        document.childByName("Table_Material").scriptAdaptor.actionQueryField("idinvoise",document.childByName("CobmboBox_Invoice").content.listValue)
        document.childByName("Table_Material").scriptAdaptor.actionQueryField("material", listArray[listIndex])
        document.childByName("Table_Material").scriptAdaptor.actionQueryEnd()
    }
    
	/* We are waiting for the record to be added to the table. If there are elements in the array, add a new record. */
    Connections {
        target: document.childByName("Table_Material").scriptAdaptor
        onEventDatabaseRowAdded: {
            if (listIndex + 1 < listArray.length) {
                listIndex = listIndex + 1
                addRow()
            }
            else {
                document.childByName("Button_Ok").scriptAdaptor.actionEnable()
            }
        }
    }
    
    Connections {
        target: document.childByName("Button_Ok").scriptAdaptor
        onEventItemPressed: {
            listArray = []
            listIndex = 0
            for ( var i = 0; i <= 9; i++) {
                if (document.childByName("TextField_Material_"+i).visible) {
                    if (document.childByName("TextField_Material_"+i).content.text != '')  {
                        listArray.push(document.childByName("TextField_Material_"+i).content.text)
                    }
                }
            }
            console.log(listArray)
            if (listArray.length > 0) {
                document.childByName("Button_Ok").scriptAdaptor.actionDisable()
                addRow()
            }
        }
    }
}
1 Like

Большое спасибо! Очень полезный урок написания скриптов!

  1. Проверяем поля
  2. Если имеется заполненное поле
  3. Делаем первое обращение к функции addRow() и создаем первую запись
  4. Отслеживаем запись в таблицу и проверяем массив, и если предел массива не достигнут, то снова обращаемся к функции addRow()

Thank you very much! A very useful scripting lesson!

  1. Checking the fields
  2. If there is a completed field
  3. Make the first call to the addRow() function and create the first record
  4. We track the entry to the table and check the array, and if the array limit is not reached, then we call the addRow() function again
1 Like

Thank you for your efforts and time.
Is there a simplified reference or book to understand the QML language in accordance with the Flipabit editor other than the Qt website because it is not simplified?

Thank you very much for your time and effort.

Question: If there is time to answer how to collect the material prices recorded in the material table and convert them to a text field called total at the end of the invoice, how do we do that?


test222.flp (32.9 KB)

1 Like

Thank you Vladimir_PV
A creative and amazing solution. Thank you very much. I will try to implement that.
I have a simple question:
When they used the method in the picture, how do I transfer the text value in the “text gridtable to a text field automatically_As shown in the pictures:1
2

2024-02-27_18-01-10

1 Like

Thank you very match for the answer and time Ms Vladimir_PV.

But the text does not appear in the text field automatically unless I click on the table? Is there a solution that allows this to happen automatically and without clicking on the table, and the text in the text field is changed automatically even if the values in the table change


Back to Flipabit >
Copyright © 2018. Flipabit Team. All rights reserved.